Hugo是一个基于golang的静态博客框架,和Hexo类似
安装
安装golang
Hugo是基于go语言开发的,所以需要安装go才能正常运行
安装Hugo
Linux下安装Hugo
- Snap
- 安装包安装
前往官方Github下载安装包
1
| dpkg -i hugo_extended_0.86.1_Linux-64bit.deb
|
查看hugo是否安装成功
1
2
3
| hugo version
# 输出
hugo v0.86.1-F6821B88+extended linux/amd64 BuildDate=2021-07-30T10:13:35Z VendorInfo=gohugoio
|
搭建博客
新建博客
生成一个blog文件夹,就是新建的博客文件夹
选择主题
Hugo的主题相较于Hexo还是偏少,可前往Hugo主题站选择
下载主题,以[hugo-theme-stack](https://github.com/CaiJimmy/hugo-theme-stack)为例, 解压至博客根目录下的themes
1
| tar -zxvf hugo-theme-stack-3.11.0.tar.gz -C themes/hugo-themes-stack
|
修改config.toml
1
| theme = "hugo-theme-stack" # 主题名称,要与主题目录下的文件夹名称一致
|
主题的功能相关配置可查看themes/hugo-theme-stack/exampleSite/config.toml,将配置项复制到根目录的config.toml即可生效
编辑文章
1
2
3
| # 新建博客文件
hugo new posts/My-First-Post.md
# 在content/posts下生成My-First-Post.md文件进行编辑即可
|
修改默认模版:
修改archetypes/default.md文件,可自定义模版,下次新建博客文件即可生效
1
2
3
4
5
6
7
8
| ---
title: "{{ replace .Name "-" " " | title }}"
date: {{ .Date }}
draft: false # ture为草稿,false为正式发布
author: # 作者
tags: # 标签
categories: # 类别
---
|
本地测试
1
2
3
4
5
6
7
8
| # 默认地址为http://localhost:1313, 运行环境为development
hugo serve
# 在服务器上可能无法正确访问localhost,因为默认bind的是127.0.0.1, 只允许本地访问。
# 可使用 --bind 绑定0.0.0.0, --baseURL 指定地址为127.0.0.1即可正常访问。
# 使用 -e 指定当前环境。
# -w 参数可实时监控文件变化,用于调试。
# --buildDrafts可显示标记为草稿的文章。
hugo server -w -e production --buildDrafts --bind="0.0.0.0" --baseURL=http://127.0.0.1:1313/
|
编译发布
1
| HUGO_ENV=production hugo --gc --minify
|
生成public文件夹。注意,draft:true的文章不会在public中生成,因为它还是草稿,不会被编译。
使用algolia搜索进行博客内容搜索
以LoveIt主题的algolia为例
- 注册algolia
- 前往algolia官网注册一个账号
- 创建一个应用
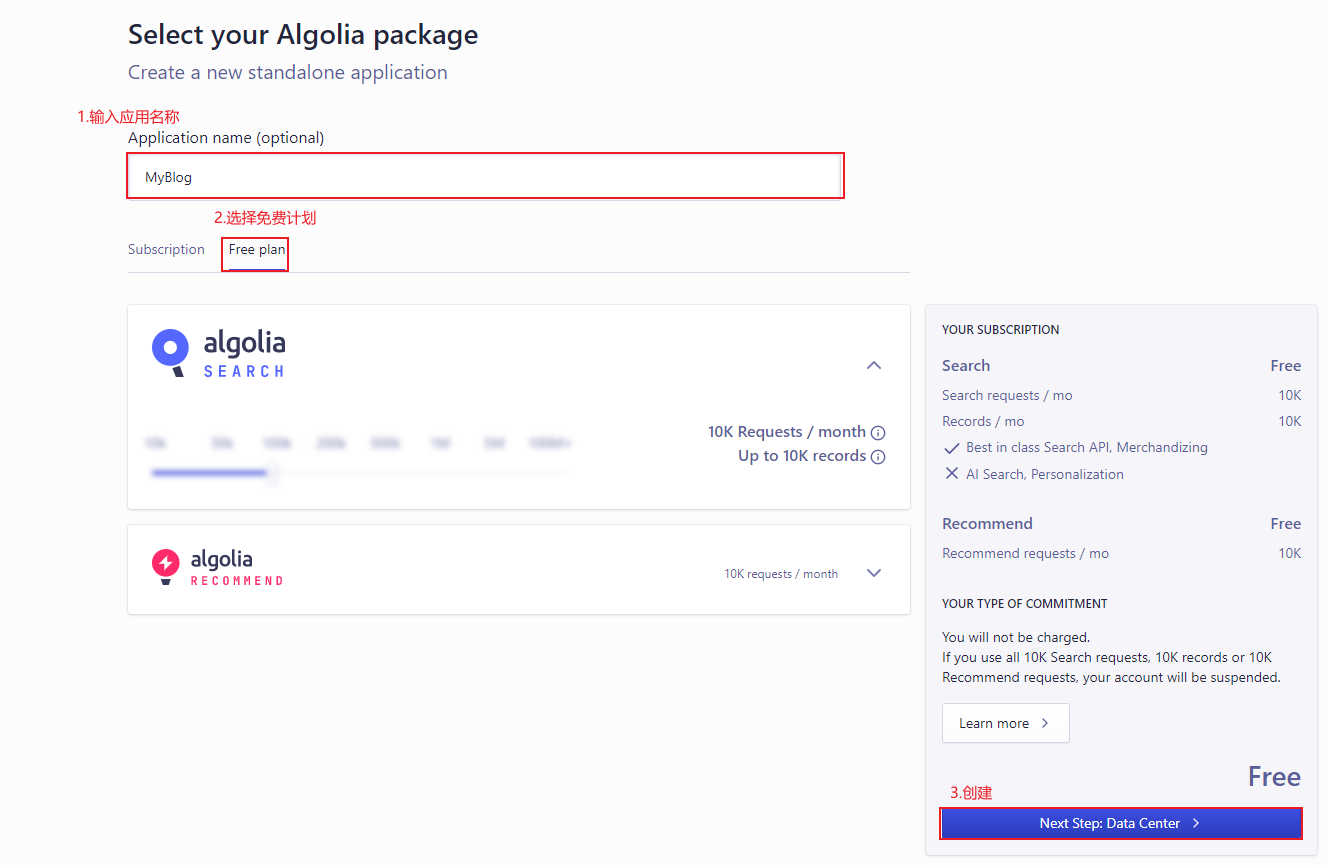 国内建议选择香港节点
 - 创建一个索引

- 查看key

- 安装algolia
使用npm下载安装atomic-algolia,该工具可对索引进行更新
npm的安装可查看Linux下node.js安装配置
npm install atomic-algolia --save
- 修改
config.toml
 1
 2
 3
 4
 5
 6
 7
 8
 9
10
11
12
13
14
15
16
17
18
19
20
21
22
23
24
25
26
27
28
29
30
| [params.search]
enable = true
# 搜索引擎的类型 ("lunr", "algolia")
type = "algolia" # 选择algolia
# 文章内容最长索引长度
contentLength = 4000
# 搜索框的占位提示语
placeholder = ""
# 最大结果数目
maxResultLength = 10
# 结果内容片段长度
snippetLength = 50
# 搜索结果中高亮部分的 HTML 标签
highlightTag = "em"
# 是否在搜索索引中使用基于 baseURL 的绝对路径
absoluteURL = false
[params.search.algolia]
index = "blog" # 索引名称
appID = "HOVR91USRQ" # 应用ID
searchKey = "xxx" # algolia搜索api的key
# 注意设置outputs,不然index.json不会生成
# Options to make hugo output files
# 用于 Hugo 输出文档的设置
[outputs]
home = ["HTML", "RSS", "JSON"]
page = ["HTML", "MarkDown"]
section = ["HTML", "RSS"]
taxonomy = ["HTML", "RSS"]
taxonomyTerm = ["HTML"]
|
- 配置
创建.env文件
1
2
3
4
| ALGOLIA_APP_ID=HOVR91USRQ
ALGOLIA_INDEX_NAME=blog
ALGOLIA_INDEX_FILE=public/index.json
ALGOLIA_ADMIN_KEY=xxx # algolia管理员的key
|
运行
1
| npm init # 一直回车即可,也可自定义参数
|
- 运行atomic-algolia
1
2
3
4
5
| # 在 public 生成 index.json
hugo
# 同步到 algolia, 如果报错提示缺少包,则运行 npm install 安装缺少的包
npm run algolia
# 同步完成可在algolia看到索引
|
此时搜索功能已配置完成,可正常使用
hugo-theme-stack主题美化
添加回到顶部按钮
编辑主题目录下layouts/_default/single.html
找到
 1
 2
 3
 4
 5
 6
 7
 8
 9
10
11
12
13
14
15
16
17
| {{ define "main" }}
{{ partial "article/article.html" . }}
{{ if .Params.links }}
{{ partial "article/components/links" . }}
{{ end }}
{{ partial "article/components/related-contents" . }}
{{ if not (eq .Params.comments false) }}
{{ partial "comments/include" . }}
{{ end }}
{{ partialCached "footer/footer" . }}
{{ partialCached "article/components/photoswipe" . }}
{{ end }}
|
在 <span class="ne-text">{{ partialCached "article/components/photoswipe" . }}</span>后添加
 1
 2
 3
 4
 5
 6
 7
 8
 9
10
11
12
13
14
15
16
17
18
19
20
21
22
23
24
25
26
27
28
29
30
31
32
33
34
35
36
37
38
39
40
41
42
| <div id="backTop" onclick="backTopFunction()" style="right: 40px; bottom: 40px; display: flex;">
<svg xmlns="http://www.w3.org/2000/svg" height="30" width="20" viewBox="0 0 512 512"><title>Caret Up</title>
<path d="M414 321.94L274.22 158.82a24 24 0 00-36.44 0L98 321.94c-13.34 15.57-2.28 39.62 18.22 39.62h279.6c20.5 0 31.56-24.05 18.18-39.62z" fill="#adb5bd"></path>
</svg>
<style type="text/css">
#backTop {
position: fixed;
background-color: #fff;
width: 40px;
height: 40px;
border-radius: 50%;
display: none;
align-items: center;
justify-content: center;
box-shadow: 0 0 6px rgba(0,0,0,.12);
cursor: pointer;
z-index: 5;
}
#backTop:hover {
background-color: #f1f4f8;
}
</style>
<script>
window.onscroll = function() {scrollFunction()};
function scrollFunction() {console.log(121);
if (document.body.scrollTop > 20 || document.documentElement.scrollTop > 20) {
document.getElementById("backTop").style.display = "flex";
} else {
document.getElementById("backTop").style.display = "none";
}
}
function backTopFunction() {
document.body.scrollTop = 0;
document.documentElement.scrollTop = 0;
}
</script>
</div>
|
加载动画
在博客根目录新建layouts/partials/footer目录,在该目录下新建custom.html文件,将下面内容复制进去
 1
 2
 3
 4
 5
 6
 7
 8
 9
10
11
12
13
14
15
16
17
18
| <script
src="https://cdn.jsdelivr.net/gh/zhixuan2333/[email protected]/js/nprogress.min.js"
integrity="sha384-bHDlAEUFxsRI7JfULv3DTpL2IXbbgn4JHQJibgo5iiXSK6Iu8muwqHANhun74Cqg"
crossorigin="anonymous"
></script>
<link
rel="stylesheet"
href="https://cdn.jsdelivr.net/gh/zhixuan2333/[email protected]/css/nprogress.css"
integrity="sha384-KJyhr2syt5+4M9Pz5dipCvTrtvOmLk/olWVdfhAp858UCa64Ia5GFpTN7+G4BWpE"
crossorigin="anonymous"
/>
<script>
NProgress.start();
document.addEventListener("readystatechange", () => {
if (document.readyState === "interactive") NProgress.inc(0.8);
if (document.readyState === "complete") NProgress.done();
});
</script>
|
美化滚动条
在博客根目录下新建assets/scss目录,在该目录下新建文件custom.scss,将下面内容复制进去
 1
 2
 3
 4
 5
 6
 7
 8
 9
10
11
12
13
14
15
16
17
18
19
20
| html{
::-webkit-scrollbar {
width: 20px;
}
::-webkit-scrollbar-track {
background-color: transparent;
}
::-webkit-scrollbar-thumb {
background-color: #d6dee1;
border-radius: 20px;
border: 6px solid transparent;
background-clip: content-box;
}
::-webkit-scrollbar-thumb:hover {
background-color: #a8bbbf;
}
}
|
使用GitHub Action自动发布
博客根目录下新建.github/workflows/main.yml, 输入以下内容
 1
 2
 3
 4
 5
 6
 7
 8
 9
10
11
12
13
14
15
16
17
18
19
20
21
22
23
24
25
26
27
28
29
30
31
32
33
34
35
36
37
38
39
40
41
42
43
44
45
46
47
48
49
50
51
52
53
54
55
56
57
58
59
60
61
62
63
64
65
66
67
| name: Deploy Hugo Blog # 自动化部署 Hugo 博客
on: # 触发条件
push:
branches:
- master # 推送到 master 分支
release:
types:
- published # 推送新版本号
workflow_dispatch: # 手动触发
jobs:
build:
name: Build
runs-on: ubuntu-latest # 使用Ubuntu最新版作为环境
steps:
- name: Checkout # Checkout仓库
uses: actions/checkout@v2
with:
ref: master
- name: Setup Hugo # 使用预编译的 Hugo 二进制文件
uses: peaceiris/[email protected]
with:
hugo-version: "latest"
extended: true # 使用 Hugo-extended 版本,不想使用extended版本选择false即可
- name: Setup algolia # 使用 npm 安装 algolia
run: |
npm install atomic-algolia --save
- name: Get username.github.io # 获取 username.github.io 以保持 commit 记录
run: |
git clone --no-checkout https://github.com/jklash1996/jklash1996.github.io.git public
- name: Build # hugo编译完后,生成 index.json, 同步到 algolia
run: |
HUGO_ENV=production hugo --gc --minify
npm run algolia
- name: Deploy to server # 使用rsync部署到云服务器,可选
uses: easingthemes/[email protected]
env:
ARGS: "-avz --delete"
SOURCE: "public/" # 要同步到服务器的目录
REMOTE_HOST: ${{ secrets.SSH_HOST}} # 服务器 IP 地址
REMOTE_USER: ${{ secrets.SSH_USER}} # 服务器 SSH 连接用户名
REMOTE_PORT: ${{ secrets.SSH_PORT}} # 服务器 SSH 端口
SSH_PRIVATE_KEY: ${{ secrets.SSH_KEY}} # 配置在服务器上公钥所对应的私钥
TARGET: ${{ secrets.WEBSITE_PATH}} # 服务器上对应网站的根目录
- name: Publish # 将生成出的站点推向 username.github.io
env:
USER: username
EMAIL: email
GH_REF: github.com/username/username.github.io.git
GH_TOKEN: ${{ secrets.GH_TOKEN }}
run: |
cd public
git config --global user.name "$USER"
git config --global user.email "$EMAIL"
export TZ='Asia/Shanghai'
git add .
git commit --allow-empty -m "Auto Update: `date +'%Y-%m-%d %H:%M:%S'`"
git push "https://$USER:$GH_TOKEN@$GH_REF" master:master
|
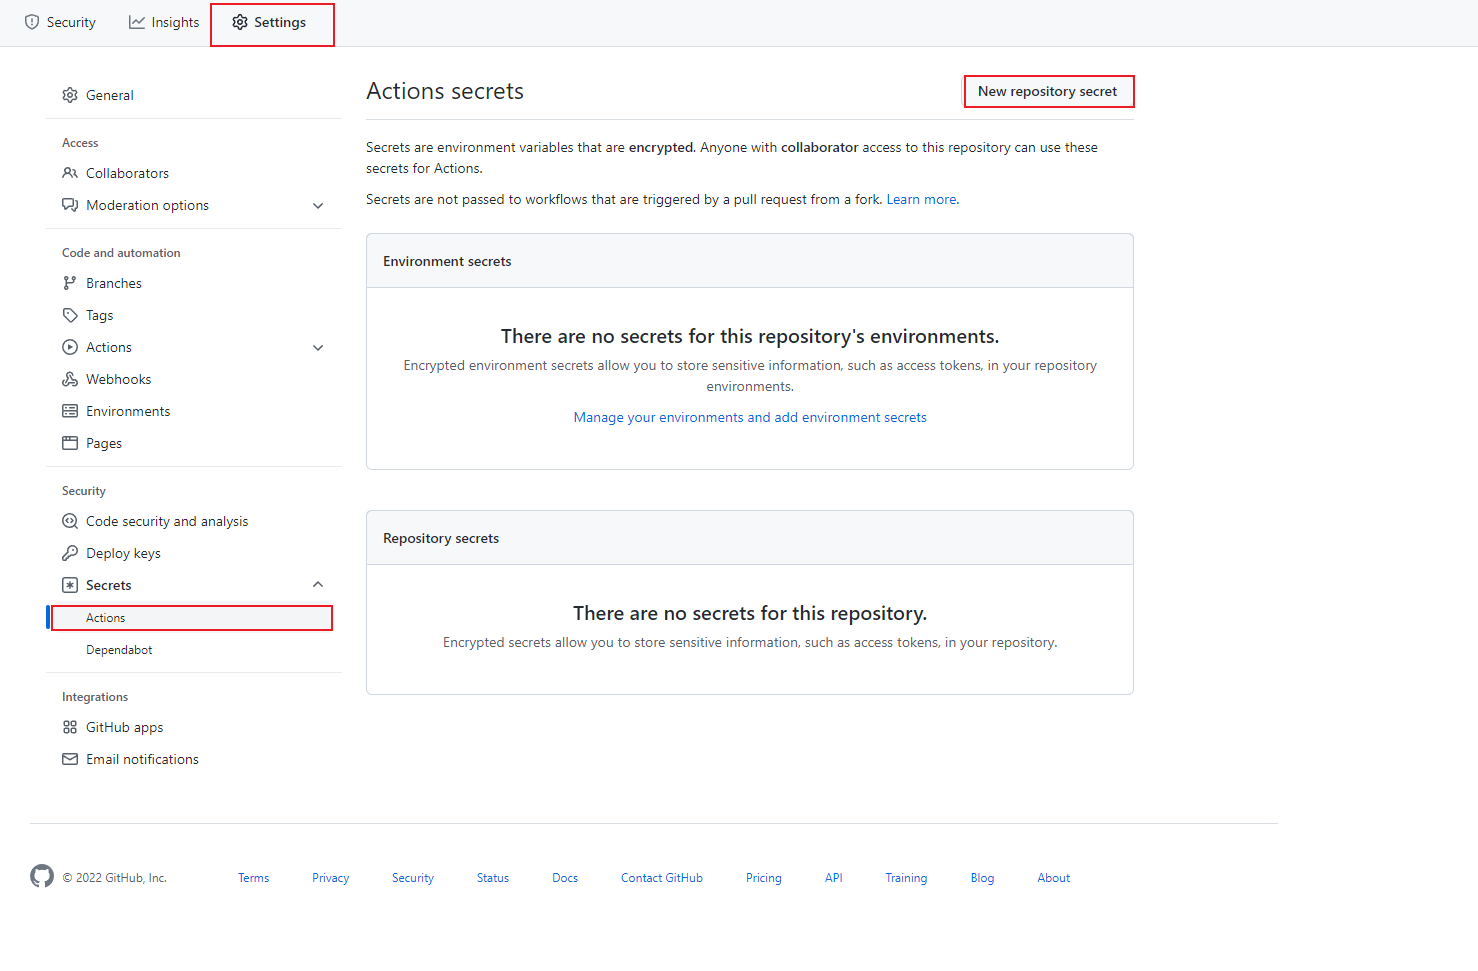
secrets可在源码仓库Settings中设置, 以保护你的信息不被泄露